Jake Sanders | 05 February 2015
You've converted your monolithic application stack into a series of linked docker containers, and everything is working great! However, you want to move the database to another node with faster disks, or perhaps spin up some more PHP interpreters to deal with additional load. Now your containers are running across several nodes and you have to reconfigure every service to point to the new locations, costing time and making your nice containerised solution no better than normal hosts running the apps themselves. In this article, we'll look at automated service discovery for docker containers, allowing you to spin up or down new services and have your containers configure themselves automatically.
The accepted solution to service discovery is to use a distributed key-value store. There are several implementations out there, including Zookeeper, etcd, Open Chord and many more. In this article we'll be taking a look at one of the newer implementations, Consul. Consul is an all-in-one solution for service discovery, health-checking and plain key-value stores. It exposes data both over an HTTP API and as a DNS server, making it extremely easy to use. Each of your applications will register themselves in Consul, and when they require a service, such as database access, they will query consul to discover which node/port that particular service is running on.
Consul is written in go, and all features are compiled in to a single static binary, easily deployed alongside your existing application. Each node runs a long-running instance of this binary, called the consul agent. Said agent can be run in either client or server mode, and from here on we'll simply refer to them as client nodes or server nodes.
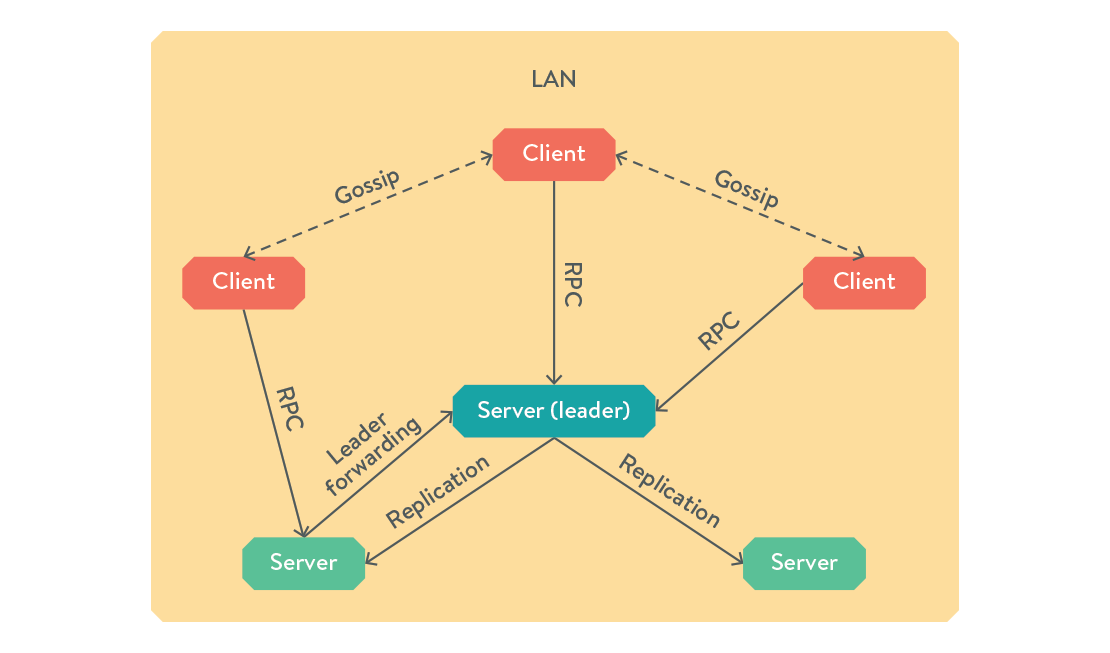
Both clients and servers present the DNS and HTTP interfaces, so you can query any node in the cluster and get the same response. If a client receives an RPC request, it forwards it to a server node for handling. When a client joins your consul cluster by contacting any existing node, the information about your new host propagates though the cluster via a gossip protocol, ensuring all nodes on the local network are kept up to date while using minimal network traffic.
A server node acts just like a regular client node, but it has a few more responsibilities, namely maintaining the state of the cluster, responding to RPC queries and participating in leader election. You will need 3 server nodes to withstand a single failure, or 5 nodes to withstand 2 simultaneous failures. If a server receives an RPC request while it is not the leader, it forwards it on to the currently elected leader.
If your cluster spans multiple datacentres, servers in each LAN can notify each other of cluster events using their own gossip pool over the internet. This is separate from the LAN gossip pool that each set of clients operates within.
Firstly, we just want to get consul up and running. Seeing as we're already using docker, why not containerise consul? Start a single-node server for testing purposes like so:
docker run -d -p 8400:8400 -p 8500:8500 -p 53:53/udp -h consul-server-node --name consul progrium/consul -server -bootstrap
Verify it's working by visiting http://[address.of.host]:8500/ui/ and you should see the web UI.
We want to use register each of our containerised services in consul, without having to reconfigure each service to become consul aware. To do this, we are going to use Registrator.
Registrator is a service that runs forever, while listening for docker events. If a container is started that publishes ports, registrator will register the service in consul, and if the container is stopped or killed, registrator will remove it. Once again, we can run it inside a container with the following command:
docker run -d --link consul:consul --name registrator -v /var/run/docker.sock:/tmp/docker.sock -h $HOSTNAME progrium/registrator consul://consul:8500
Now, run a service that exposes a port, for example:
docker run -d -P --name nginx nginx
Finally, check the consul web UI, and you will be able to see the name of the service and published port. In order to programmatically retrieve it, you can use HTTP or DNS. For example:
$ curl http://localhost:8500/v1/catalog/services
{"consul":[],"consul-53":["udp"],"consul-8400":[],"consul-8500":[],"nginx-443":[],"nginx-80":[]}
$ dig @localhost nginx-80.service.consul
;; ANSWER SECTION:
nginx-80.service.consul. 0      IN      A       172.17.0.104
I would recommend you take a quick glance at the official documentation now, so you can get a grasp on how one would use consul's API.
The toy implementation is pretty useless, as it accomplishes nothing you couldn't do with "docker inspect." We will now deploy consul across 3 hosts, and show how to get a service running on one host to talk to a service on another.
I will assume your nodes are all on the same LAN, or are connected with via some other means like a VPN or a cloud provider's "private network" option. If not, the tutorial will work just fine over WAN, but beware you will be left with an insecure cluster!
On each host, run the following commands:
export PRIVATE_IP=[your private IP here]
export BRIDGE_IP=172.17.42.1 # Change if you're using a non-default docker bridge
docker run -d --name consul -h $HOSTNAME \
-p $PRIVATE_IP:8300:8300 -p $PRIVATE_IP:8301:8301 -p $PRIVATE_IP:8301:8301/udp \
-p $PRIVATE_IP:8302:8302 -p $PRIVATE_IP:8302:8302/udp -p $PRIVATE_IP:8400:8400 \
-p $PRIVATE_IP:8500:8500 -p $BRIDGE_IP:53:53/udp \
progrium/consul -server -advertise $PRIVATE_IP -bootstrap-expect 3
docker run -d –name registrator

-v /var/run/docker.sock:/tmp/docker.sock

-h $HOSTNAME progrium/registrator consul://$PRIVATE_IP:8500
Then on the other 2 hosts, instruct them to join the cluster:
$ docker exec consul consul join [private IP of first host]
Successfully joined cluster by contacting 1 nodes.
We can add new hosts at any time by running the consul agent in client mode instead of server mode. for example, let's expose the web UI on a 4th host:
export PRIVATE_IP=[your private IP here]
docker run -d –name consul -h $HOSTNAME

-p 8300:8300 -p 8301:8301 -p 8301:8301/udp -p 8302:8302 -p 8302:8302/udp

-p 8400:8400 -p 8500:8500 -p 53:53/udp

progrium/consul -advertise $PRIVATE_IP -join [IP of an existing node]
Now you can visit http://[IP of 4th host]:8500/ui and view your cluster state. The overall topology of our cluster now looks like this:
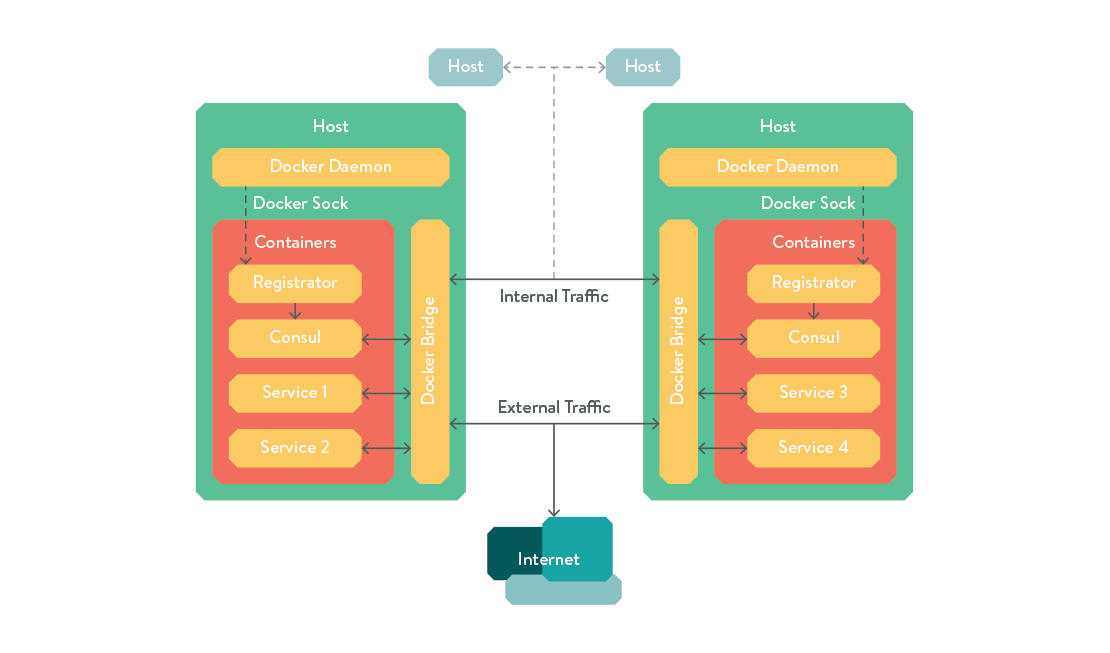
Now we have all our services registered in a decentralised key-value store, we would like any parts of our application stack that depend on each other to be automatically configured to point at the node on which that dependency is currently running. A simple way is to use consul's DNS resolver. If you review the set-up commands from earlier in the article, you'll notice we forwarded requests to UDP port 53 (DNS) on the docker bridge IP to the consul container. This means if you create a new container and pass "–dns=" to your docker run command, you will be able to access your other services as if they were running anywhere on the internet. For example, let's fire up a mysql container on one of our hosts:
docker run -d --dns=172.17.42.1 --name mysql -p 3306:3306 -e MYSQL_ROOT_PASSWORD=consul-test mysql:5.5
Then on a different host, you will be able to access that container by referring to the special domain "service.consul."
docker run --rm -it --dns=172.17.42.1 ubuntu bash
$ apt-get update && apt-get install mysql-client
$ mysql -u root -h mysql.service.consul -p
Enter password:
Welcome to the MySQL monitor.  Commands end with ; or \g.
Your MySQL connection id is 4
Server version: 5.5.41 MySQL Community Server (GPL)
However, for many applications, DNS-based resolution is unsuitable. For example, if you need to know the port a service is running on, Consul will expose it through an SRV record, but most applications do not support these. Other applications won't support DNS at all, preferring hard-coded IP addresses in configuration files. To support these applications, we will use...
Consul-template is a daemon that queries consul and updates any number of configuration files on the filesystem, then optionally restarts other daemons whenever a configuration change is detected. We'll use this configure an nginx container to pass any PHP requests to a PHP container running somewhere on the cluster.
As consul template is a daemon itself, this means we'll have to run 2 processes inside our container. There are many ways of doing this, but one of the most lightweight solutions is to use runit, basically a very tiny init replacement for embedded devices, or in our case, containers. runit simply takes a directory containing text files that describe how to run a service, runs them, restarts them if they die, and cleans them up when the container is requested to stop.
N.B. All the code for this container is stored in this git repository, so it's probably easiest to clone it and make your own changes as you follow along.
Firstly, let's create the runit service files for consul-template and nginx:
consul-template.service
#!/bin/sh
CONSUL=consul.service.consul
exec consul-template \
-consul=$CONSUL:8500 \
-template "/etc/consul-templates/nginx.conf:/etc/nginx/nginx.conf:sv hup nginx"
nginx.service
#!/bin/sh
/usr/sbin/nginx -c /etc/nginx/nginx.conf -t && \
exec /usr/sbin/nginx -c /etc/nginx/nginx.conf
Next, create the consul template configuration for nginx. It looks mostly the same as a standard configuration, apart from this block:
nginx.conf
...
upstream php {
least_conn;
{{range service "tiny-php5-fpm"}}server {{.Address}}:{{.Port}} max_fails=3 fail_timeout=60 weight=1;
{{else}}server 127.0.0.1:65535; # force a 502{{end}}
}
...
location ~ \.php {
include                 fastcgi_params;
fastcgi_index   index.php;
fastcgi_param   SCRIPT_FILENAME $document_root$fastcgi_script_name;
fastcgi_pass    php;
}
This is the magic that consul-template will replace with the services it's read from your consul instance.
Finally the Dockerfile:
Dockerfile
FROM jakexks/tiny-nginx
MAINTAINER Jake Sanders
ADD consul-template /bin/consul-template
RUN mkdir -p /etc/service/nginx && mkdir -p /etc/service/consul-template && rm /etc/nginx/nginx.conf
ADD consul-template.service /etc/service/consul-template/run
ADD nginx.conf /etc/consul-templates/nginx.conf
ADD nginx.service /etc/service/nginx/run
CMD ["/usr/bin/runsvdir”, “/etc/service”]
Let's try it out! On one host, run:
docker run -d -P --name php jakexks/tiny-php5-fpm
On another, run:
docker run -d --dns=172.17.42.1 -p 80:80 --name livewyer-nginx jakexks/livewyer-nginx-consul
then visit http://[IP of nginx node]/index.php and you should see the phpinfo() page.
For homework, run several nginx containers across your cluster and configure a load-balancer that discovers them all using consul-template. If you've been following this article all the way through, it should be fairly easy!